


|
Raspberry Pi Pico |
x 1 | |
|
|
GC9A01 Round Display 240x240 pixels |
x 1 |

|
arduino IDEArduino
|
|
|
|
TFT-eSPI LibraryBodmer
|
Raspberry Pi Pico with GC9A01 Round Display using Arduino IDE and TFT-eSPI Library
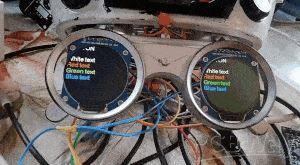
This is a work in progress for another one of the artifacts I used in Leonardo Cortez's "Strange House".
In one scene of the plays, the actors (who play two children) wear these glasses in the dark, while a ghostly appearance moves around the stage. The version used in the play uses Teensy 3.2 and works perfectly. Now I am trying to do the same using Raspberry Pi Pico. The Animated Eyes example of library still not working. But I was able to get the Colour_Test the library to work by creating the appropriate User_Setup.h
But the board is more expensive than the Raspberry Pi Pico and it makes a considerable difference in our budget.
So I continued the research to use a Raspberry Pi Pico instead of Teensy 3.2.
Probably, after completing the research, I will create two shields, one for Teensy 3.2 and the other for Raspberry Pi Pico, in the shape of glasses, with lithium battery power and rechargeable.
Let's look at the specifications of both boards:
Specs | Teensy 3.2 | Pico
Processor | Arm Cortex M4 | Dual Core Arm Cortex M0+
Clock | 96 Mhz | 133 Mhz
RAM | 64K | 264 K
Flash | 256K | 2Mb
EEPROM | 2K | None
Price | US$ 25 | Less than US$ 10
Although the price is lower, the Raspberry Pi Pico is still a recent board and its support is just beginning. Teensy 3.2, on the other hand, already has a very robust support. As I had only five weeks to complete all the set design and special effects used in the play, I opted for the controller already supported by the original project "Uncanny Eyes", from Adafruit, already mentioned in my other project - "Alastor Moody Eyes".
But now, after filming the show, I can look back to finding a cheaper version.
If you haven't installed Raspberry Pi Pico support on the Arduino IDE yet, follow the tutorial on Tom's Hardware: https://www.tomshardware.com/news/raspberry-pi-pico-arduino-official
Second, install the excellent TFT-eSPI library using the library manager. In Arduino IDE menu Sketch > Include Library > Library Manager
Search for TFT-eSPI.
Or, you can download the zip file in Github and install it. https://github.com/Bodmer/TFT_eSPI
The developer of this library made it much easier to configure the different types of display with the different types of controllers. To change the settings, you can create a specific USER_SETUP file and change things like the pins used, the spi clock speed, the type of display used, etc...
To do this, go to the library folder in Libraries/TFT-eSPI-master/User_Setups/ and create a file called Setup61_RP2040_GC9A01.h with the following content:
#define GC9A01_DRIVER // Round TFT SPI Display

#define TFT_WIDTH  240 // ST7789 240 x 240 and 240 x 320
#define TFT_HEIGHT 240 // GC9A01 240 x 240

#define TFT_MISO 0 // RX PIN - Not Connected in display
#define TFT_SCLK 2 // In display, connect to SCL
#define TFT_MOSI 3 // In display, connect to SDA
#define TFT_CS   20  // In display, connect to CS
#define TFT_DC   18  // In display, connect to DC
#define TFT_RST  19  // In display, connect to RES

#define TFT_BL   17            // In display, connect to BLK
#define TFT_BACKLIGHT_ON HIGH  // Level to turn ON back-light (HIGH or LOW)

#define LOAD_GLCD
#define LOAD_FONT2
#define LOAD_FONT4
#define LOAD_FONT6
#define LOAD_FONT7
#define LOAD_FONT8
#define LOAD_GFXFF
#define SMOOTH_FONT

#define SPI_FREQUENCY  27000000 // This display can′t work in higher frequencies

// Optional reduced SPI frequency for reading TFT
#define SPI_READ_FREQUENCY  20000000

// Optional reduced SPI frequency for reading TFT
#define SPI_READ_FREQUENCY  5000000
Second, change the content of User_Setup_Select.h file in Libraries/TFT-eSPI-master/ folder, commenting the line:
//#include <User_Setup.h>
and then create the following line:
#include <User_Setups/Setup61_RP2040_GC9A01.h>
It's as simple as that!

The connections are the indicated in file. The MISO Pin does not exist in GC9A01 display, so you don't need to worry about this connection.
GC9A01 | Pico
GND | any GND
VCC | 3V3 Out
SCL | GP2
SDA | GP3
RES | GP19
DC | GP18
CS | GP20 (and GP21 when using two displays - this could be changed later)
BLK | GP17
The following code is the same as the library example (in File > Examples > TFT_eSPI > Test_and_Diagnostics > Colour_Test:
//   Diagnostic test for the displayed colour order
//
// Writen by Bodmer 17/2/19 for the TFT_eSPI library:
// https://github.com/Bodmer/TFT_eSPI

/*
 Different hardware manufacturers use different colour order
 configurations at the hardware level.  This may result in
 incorrect colours being displayed.

 Incorrectly displayed colours could also be the result of
 using the wrong display driver in the library setup file.

 Typically displays have a control register (MADCTL) that can
 be used to set the Red Green Blue (RGB) colour order to RGB
 or BRG so that red and blue are swapped on the display.

 This control register is also used to manage the display
 rotation and coordinate mirroring. The control register
 typically has 8 bits, for the ILI9341 these are:

 Bit Function
 7   Mirror Y coordinate (row address order)
 6   Mirror X coordinate (column address order)
 5   Row/column exchange (for rotation)
 4   Refresh direction (top to bottom or bottom to top in portrait orientation)
 3   RGB order (swaps red and blue)
 2   Refresh direction (top to bottom or bottom to top in landscape orientation)
 1   Not used
 0   Not used

 The control register bits can be written with this example command sequence:

    tft.writecommand(TFT_MADCTL);
    tft.writedata(0x48);          // Bits 6 and 3 set

 0x48 is the default value for ILI9341 (0xA8 for ESP32 M5STACK)
 in rotation 0 orientation.

 Another control register can be used to "invert" colours,
 this swaps black and white as well as other colours (e.g.
 green to magenta, red to cyan, blue to yellow).

 To invert colours insert this line after tft.init() or tft.begin():

    tft.invertDisplay( invert ); // Where invert is true or false

*/

#include <SPI.h>

#include <TFT_eSPI.h>       // Hardware-specific library

TFT_eSPI tft = TFT_eSPI();  // Invoke custom library

void setup(void) {
  tft.init();

  tft.fillScreen(TFT_BLACK);

  // Set "cursor" at top left corner of display (0,0) and select font 4
  tft.setCursor(0, 0, 4);

  // Set the font colour to be white with a black background
  tft.setTextColor(TFT_WHITE, TFT_BLACK);

  // We can now plot text on screen using the "print" class
  tft.println("Intialised default\n");
  tft.println("White text");

  tft.setTextColor(TFT_RED, TFT_BLACK);
  tft.println("Red text");

  tft.setTextColor(TFT_GREEN, TFT_BLACK);
  tft.println("Green text");

  tft.setTextColor(TFT_BLUE, TFT_BLACK);
  tft.println("Blue text");

  delay(5000);

}

void loop() {

  tft.invertDisplay( false ); // Where i is true or false

  tft.fillScreen(TFT_BLACK);

  tft.setCursor(0, 0, 4);

  tft.setTextColor(TFT_WHITE, TFT_BLACK);
  tft.println("Invert OFF\n");

  tft.println("White text");

  tft.setTextColor(TFT_RED, TFT_BLACK);
  tft.println("Red text");

  tft.setTextColor(TFT_GREEN, TFT_BLACK);
  tft.println("Green text");

  tft.setTextColor(TFT_BLUE, TFT_BLACK);
  tft.println("Blue text");

  delay(5000);


  // Binary inversion of colours
  tft.invertDisplay( true ); // Where i is true or false

  tft.fillScreen(TFT_BLACK);

  tft.setCursor(0, 0, 4);

  tft.setTextColor(TFT_WHITE, TFT_BLACK);
  tft.println("Invert ON\n");

  tft.println("White text");

  tft.setTextColor(TFT_RED, TFT_BLACK);
  tft.println("Red text");

  tft.setTextColor(TFT_GREEN, TFT_BLACK);
  tft.println("Green text");

  tft.setTextColor(TFT_BLUE, TFT_BLACK);
  tft.println("Blue text");

  delay(5000);
}
Now I'm working to make possible the Animated_Eyes example (in Examples/Generic/Animated_Eyes_2/), which is what I'm using in the theater show.
Raspberry Pi Pico with GC9A01 Round Display using Arduino IDE and TFT-eSPI Library


- Comments(5)
- Likes(1)
More by nicolaudosbrinquedos
-
 Homeassistant in Beaglebone Black With Debian 11
Intro: The primary objective of my project was to give some use to the Beaglebone Black that has bee...
Homeassistant in Beaglebone Black With Debian 11
Intro: The primary objective of my project was to give some use to the Beaglebone Black that has bee...
-
 The Adventures of Porting Circuitpython to Wio RP2040
I have been developing some electronic props solutions for Escape Rooms. And periodically I usually ...
The Adventures of Porting Circuitpython to Wio RP2040
I have been developing some electronic props solutions for Escape Rooms. And periodically I usually ...
-
 Simple Electronics to Escape Room Owners - Using a bunch of voltmeters with PCA9685
This is a preliminary study for an Escape Room game. My main goal was to add as many analog displays...
Simple Electronics to Escape Room Owners - Using a bunch of voltmeters with PCA9685
This is a preliminary study for an Escape Room game. My main goal was to add as many analog displays...
-
 Simple Electronics to Escape Room Owners - First Chapter
I've been developing puzzles and artifacts for Escape Room since 2018 and most of the time, I've bee...
Simple Electronics to Escape Room Owners - First Chapter
I've been developing puzzles and artifacts for Escape Room since 2018 and most of the time, I've bee...
-
 Finally! Animated Eyes using Seed Xiao RP2040
This is another advance in my studies to enable a more economically viable version for the Monster M...
Finally! Animated Eyes using Seed Xiao RP2040
This is another advance in my studies to enable a more economically viable version for the Monster M...
-
 Circuitpython on Seeed XIAO RP2040
Step 1: Unboxing... I2C Not Working?As soon as the card arrived, I installed the firmware version fo...
Circuitpython on Seeed XIAO RP2040
Step 1: Unboxing... I2C Not Working?As soon as the card arrived, I installed the firmware version fo...
-
 Raspberry Pi Pico with GC9A01 Round Display using Arduino IDE and TFT-eSPI Library
This is a work in progress for another one of the artifacts I used in Leonardo Cortez's "Strange Hou...
Raspberry Pi Pico with GC9A01 Round Display using Arduino IDE and TFT-eSPI Library
This is a work in progress for another one of the artifacts I used in Leonardo Cortez's "Strange Hou...
-
 Recreating an 80s TV with Raspberry Pi
Recently I built a series of special effects for the scenography of the play "Strange House" by Leon...
Recreating an 80s TV with Raspberry Pi
Recently I built a series of special effects for the scenography of the play "Strange House" by Leon...
-
 Talk to Me
This project is part of an extensive research on the use of animatronics and interactive objects tha...
Talk to Me
This project is part of an extensive research on the use of animatronics and interactive objects tha...
-
 Back in time! Make a Zoetrope using Arduino
I'm working on a series of animated objects for a children's play and decided to build a Zoetrope, t...
Back in time! Make a Zoetrope using Arduino
I'm working on a series of animated objects for a children's play and decided to build a Zoetrope, t...
-
 Alastor Moody Eye using Raspberry Pi Pico, CircuitPython and Round Display GC9A01
I am developing a series of objects for a children's play about fear and terror. And then I got insp...
Alastor Moody Eye using Raspberry Pi Pico, CircuitPython and Round Display GC9A01
I am developing a series of objects for a children's play about fear and terror. And then I got insp...
-
 The Crazy Pots Game
At some point on the internet I came across someone who had made a game like that, but unfortunately...
The Crazy Pots Game
At some point on the internet I came across someone who had made a game like that, but unfortunately...
-
 Arduino Mastermind Game
I created this little game as a hobby for my children during the Covid-19 quarantine. I had already ...
Arduino Mastermind Game
I created this little game as a hobby for my children during the Covid-19 quarantine. I had already ...
-
 Raspberry Pi Pico With I2C Oled Display and CircuitPython
This is my first experience using this little board from Raspberry Pi Foundation.I preferred to inst...
Raspberry Pi Pico With I2C Oled Display and CircuitPython
This is my first experience using this little board from Raspberry Pi Foundation.I preferred to inst...
-
 Raspberry Pi Pico and TFT ILI9341 with Circuit Python
I decided to write another tutorial on the Raspberry Pi Pico, mainly because the card is very recent...
Raspberry Pi Pico and TFT ILI9341 with Circuit Python
I decided to write another tutorial on the Raspberry Pi Pico, mainly because the card is very recent...
-
 Arduino Minesweeeper
It was then that I found the works of Rachit Belwariar, on the page https://www.geeksforgeeks.org/cp...
Arduino Minesweeeper
It was then that I found the works of Rachit Belwariar, on the page https://www.geeksforgeeks.org/cp...
-
-
Open Source Very Large Stick - Freejoy & MMjoy2 breakout board
567 0 0 -
RF Control training board for students based on ESP32 C3
756 0 2 -
-
KINETIC COASTERS with a TWIST! Laser or 3D Print some DIY Magic
649 0 1 -
RPI - 8 IO PLC With ATTiny85 Watch Dog
560 0 1 -
Nintendo Famicom HVC-001 Controller Shells
671 0 1 -
COMMODORE 128 DIAGNOSTIC REV.785260 KEYBOARD DONGLE
625 0 4


