


|
|
Neodimium magnet |
x 1 | |
|
|
Small E-type trafo |
x 1 | |
|
|
Aluminum plate with a thickness of about 1 mm |
x 1 | |
|
|
spring |
x 1 |

|
Soldering Iron Kit |
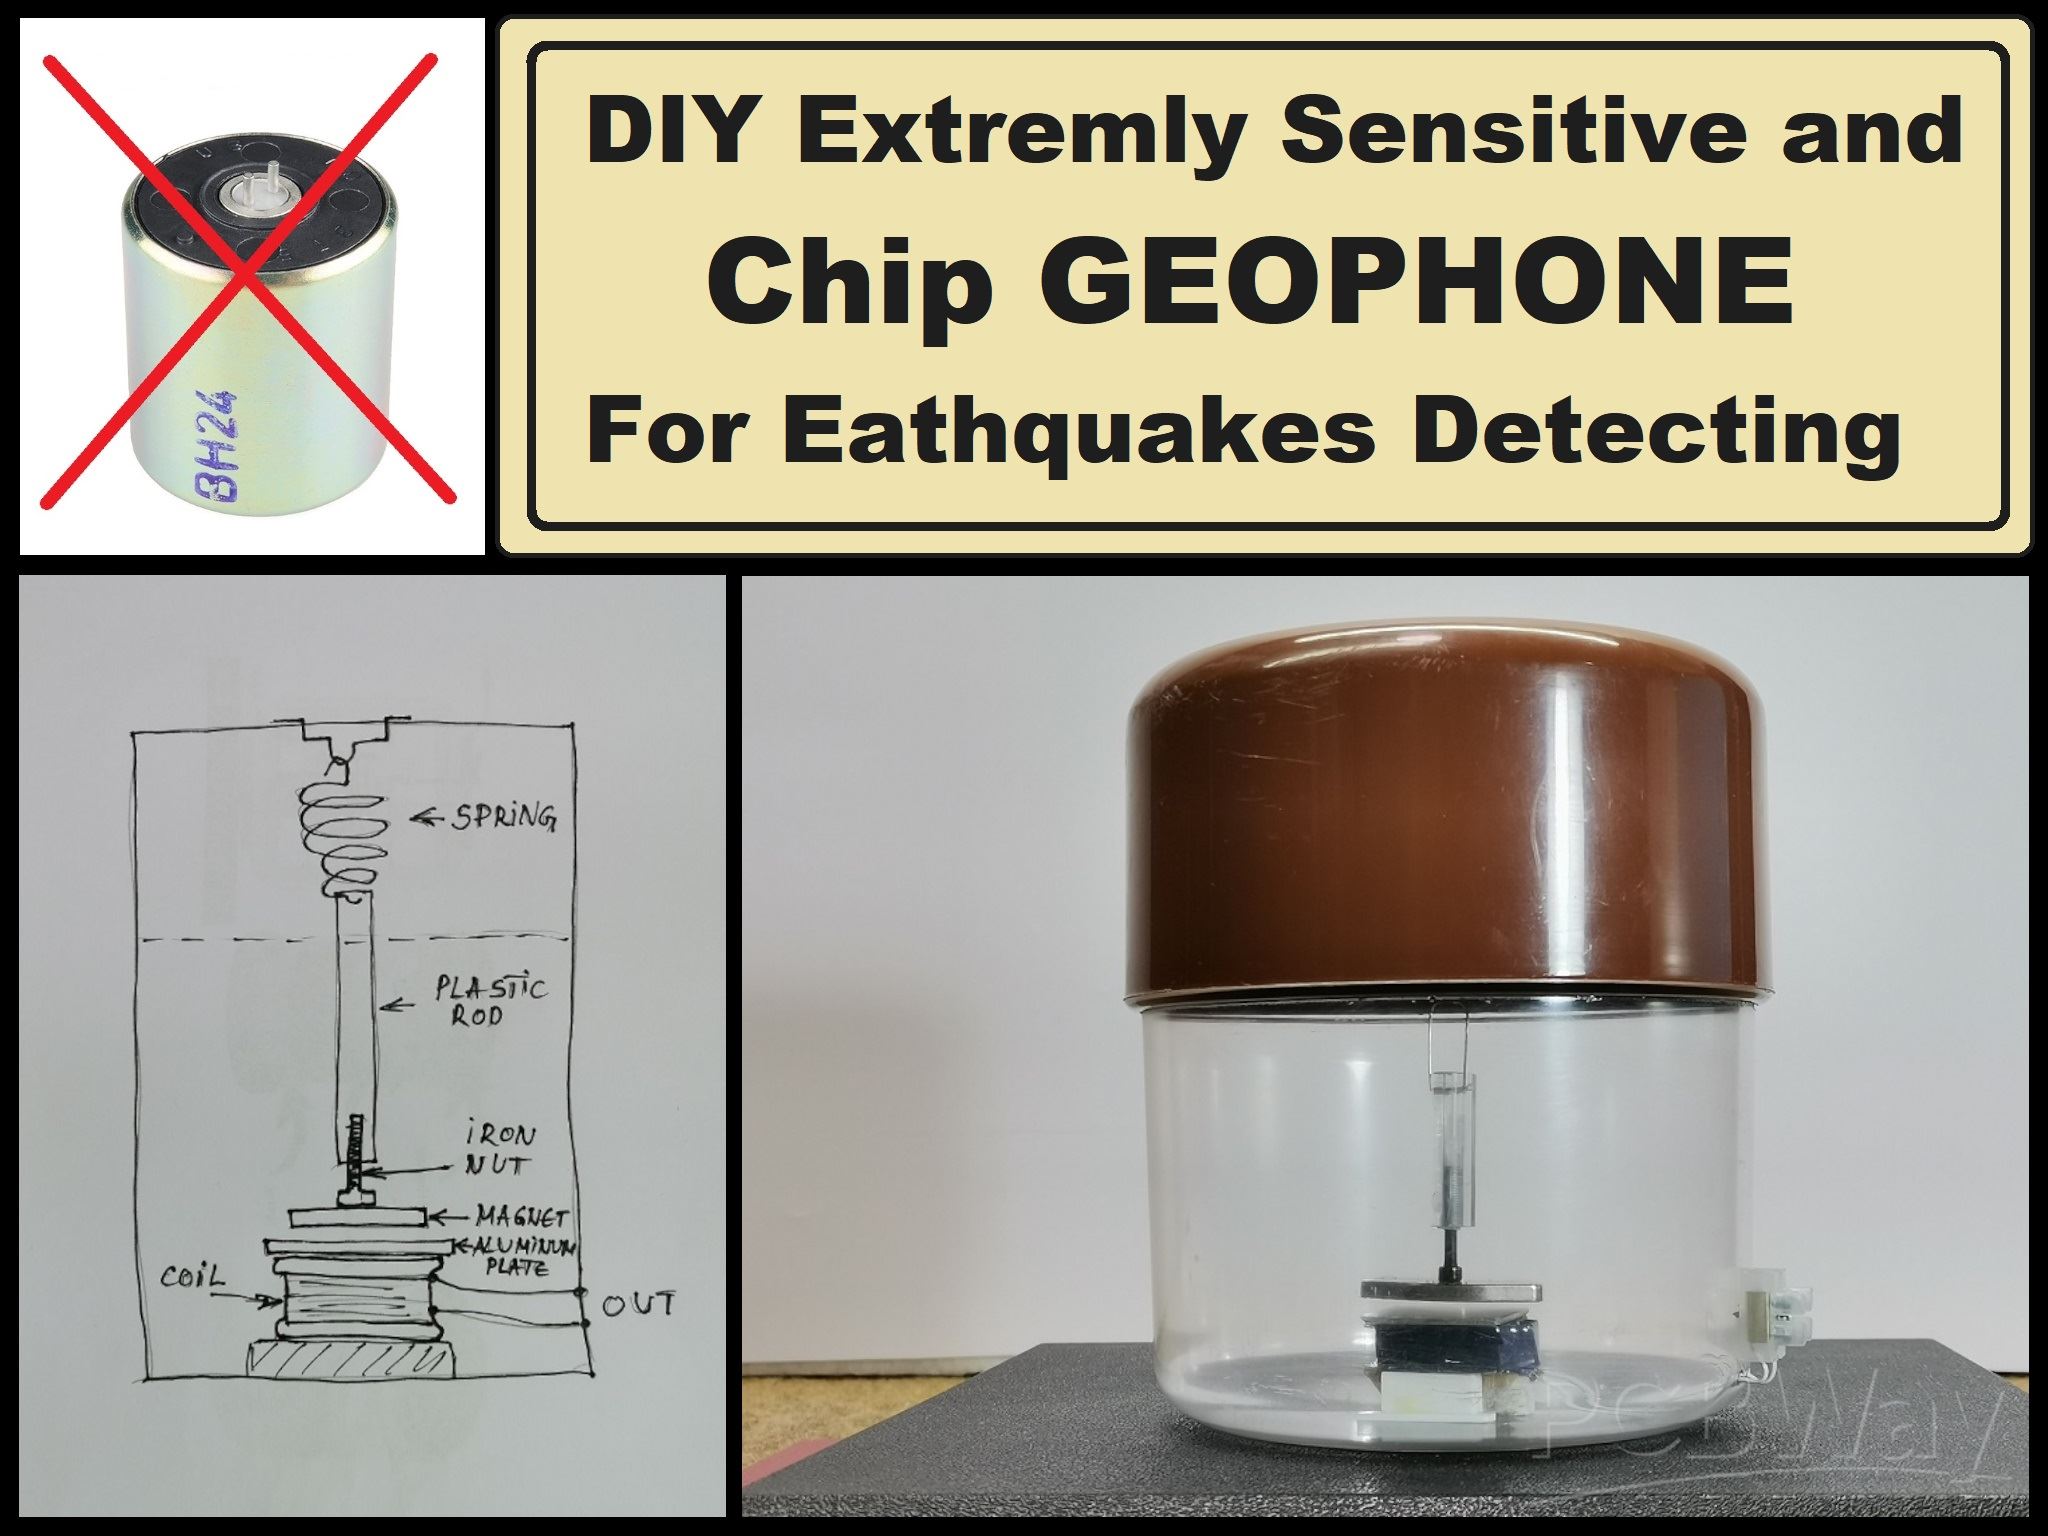
DIY Extremly Sensitive and cheap Geophone sensor for Earthquakes detecting
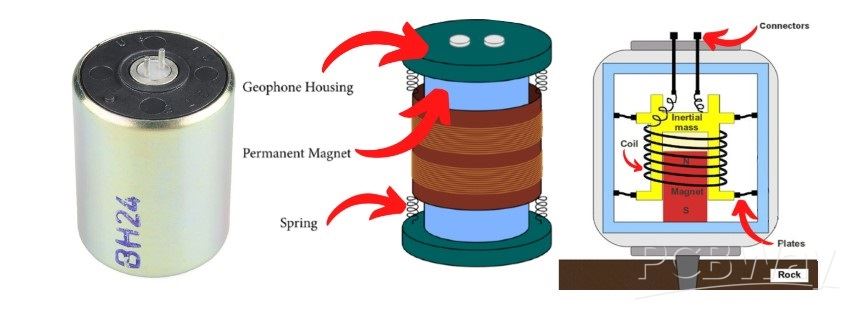
A geophone is a device used in geophysics to detect ground movement. It is specifically designed to measure seismic waves, which are produced by various sources, including earthquakes, and explosions. Typically consist of a mass suspended on a spring and a coil of wire within a magnetic field. When the ground shakes due to seismic activity, the mass moves, causing the coil to move within the magnetic field. This movement induces an electrical voltage in the coil.
This signal is then amplified and filtered, then it is brought to a computer where it is visualized and logged for later analysis with specially designed software for this purpose. Unfortunately, these sensors are mostly unavailable to self-builders due to their high price. This time I will describe to you how to make such a sensor yourself for free from parts that can be found in any workshop.
However, the sensitivity does not lag behind commercial geophones at all. Even this sensor reacts to shocks in all possible directions which makes it incredibly practical, In other words, it replaces many different types of Geophones.
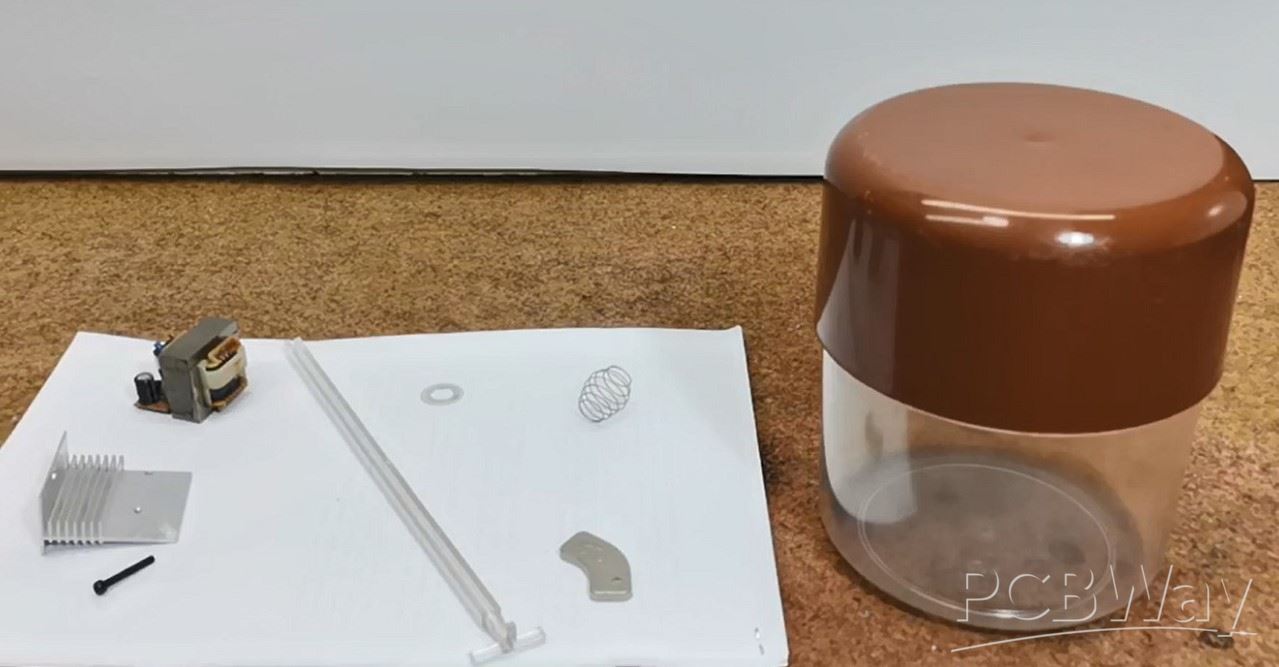
We only need a few components to make it.
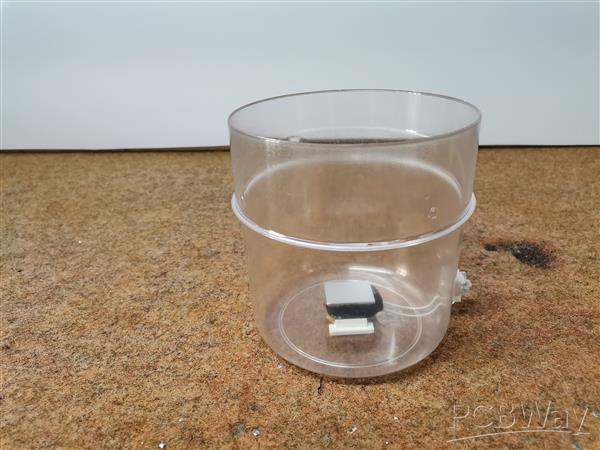
- A plastic container, which serves to isolate the sensor from external influences, and it is preferable to be transparent (I use an ordinary plastic box for storing sugar or coffee)
- A small mains transformer taken out of an old electronic device with a power of a few watts
- Neodymium magnet (I use a magnet removed from an old PC hard drive)
- Aluminum or copper plate with a thickness of about 1 mm
- light spring
- and some nuts and bolts as needed
This project is sponsored by PCBWay. They has all the services you need to create your project at the best price, whether is a scool project, or complex professional project. On PCBWay you can share your experiences, or get inspiration for your next project. They also provide completed Surface mount SMT PCB assemblY service at a best price, and ISO9001 quality control. Visit pcbway.com for more services.

This time we will make only the Geophone, and in one of the following videos I will present you the method of making the signal amplifier, filter, as well as the A/D converter, where I will try to do it in the simplest way so that it is closer to a larger number of enthusiasts who potentially would like to make it. I will also describe how to set up a simple 24/7 monitoring software to work with this sensor.
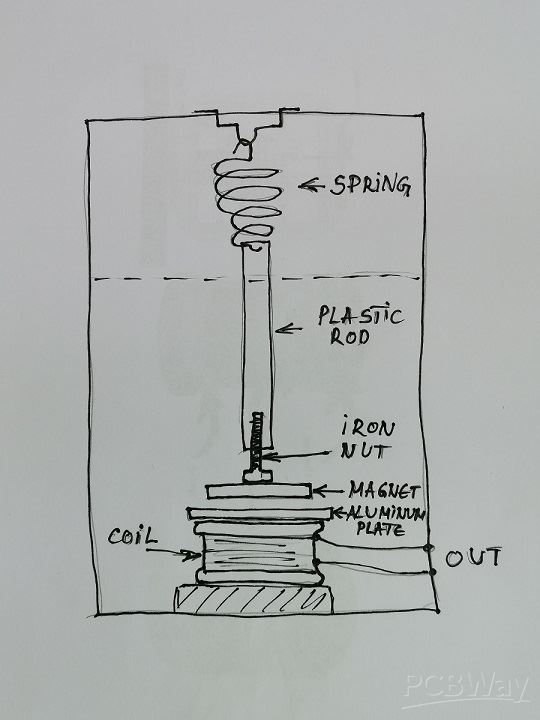
Now let's start making the sensor. First we need to disassemble the transformer, actually separate the windings from the metal part.

We need the primary winding, which contains a larger number of windings with a thinner wire. If the windings are covered with insulating tape, then with an ohmmeter we look for the winding with the highest resistance. Of course, we can also make this coil by winding 500 to 1500 turns of thin lacquered copper wire with a diameter of 0.1 mm

This winding need to be glued to the bottom of the box. Then we take the two leads from the winding with thin wires outside the box to a small terminal. Next, we glue the aluminum plate on top of the coil, which should have the same shape as the coil. This plate has the function of preventing the long-term oscillation of the magnet after the earthquake, and this process is called damping. When a magnetic field moves through a conductor the movement induces an eddy current in the conductor. The flow of electrons in the conductor immediately creates an opposing magnetic field which results in damping of the magnet.
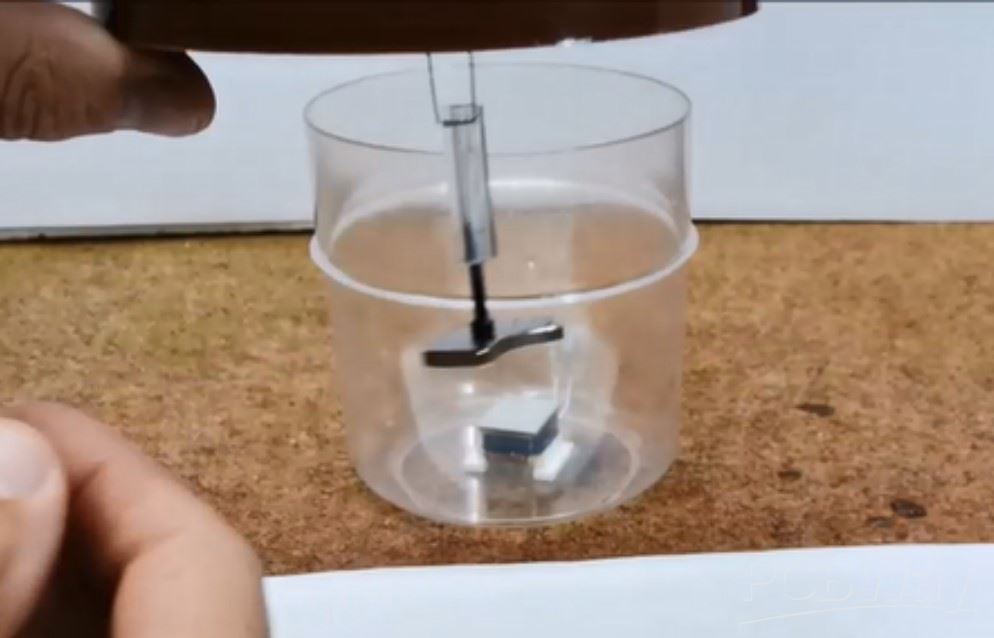
The length of the combination spring + rod + screw + magnet should be adjusted so that when the lid is closed, the magnet hangs approximately 1-1.5 mm above the aluminum plate.

As you can see, the sensor is sensitive to shocks from all directions and axes. During a vertical shock, which usually occurs near the epicenter, the spring reacts, and during a horizontal movement, the pendulum can move in all directions 360 degrees. Such sensors that respond in all axes are very expensive and are used only for professional purposes. This diy geophone can be mounted on the ground using spikes or other mechanisms to ensure good contact with the Earth's surface. In some cases, geophones are buried at varying depths.

And finally a short conclusion: This sensor is conceived as part of the final project, which will actually be a stand-alone seismometer and will display the relative intensity of the earthquake at the point of detection. Determining the direction, distance, and magnitude of an earthquake at the epicenter requires the interaction of at least three seismometers, but for this topic in another project. In the next video that I will promote soon, will be described the electronic part consisting of an amplifier, filter, A/D converter and PC software. Thus we will get a complete extremely cheap and sensitive home seismometer whose results (seismograms) are almost identical to those of the official seismological institutes. In the following, I will present to you several reports from my seismometer, which uses the above-described sensor.
1. An earthquake with a magnitude of 7.2 on the Richter scale occurred 2 October 2021 at 08:29 h Ohrid time at a depth of 530 km on the island of Vanuatu, west of Australia in the Pacific Ocean. This is how this earth looks like, taken by my Seismometer at a distance of 15600 km from Ohrid


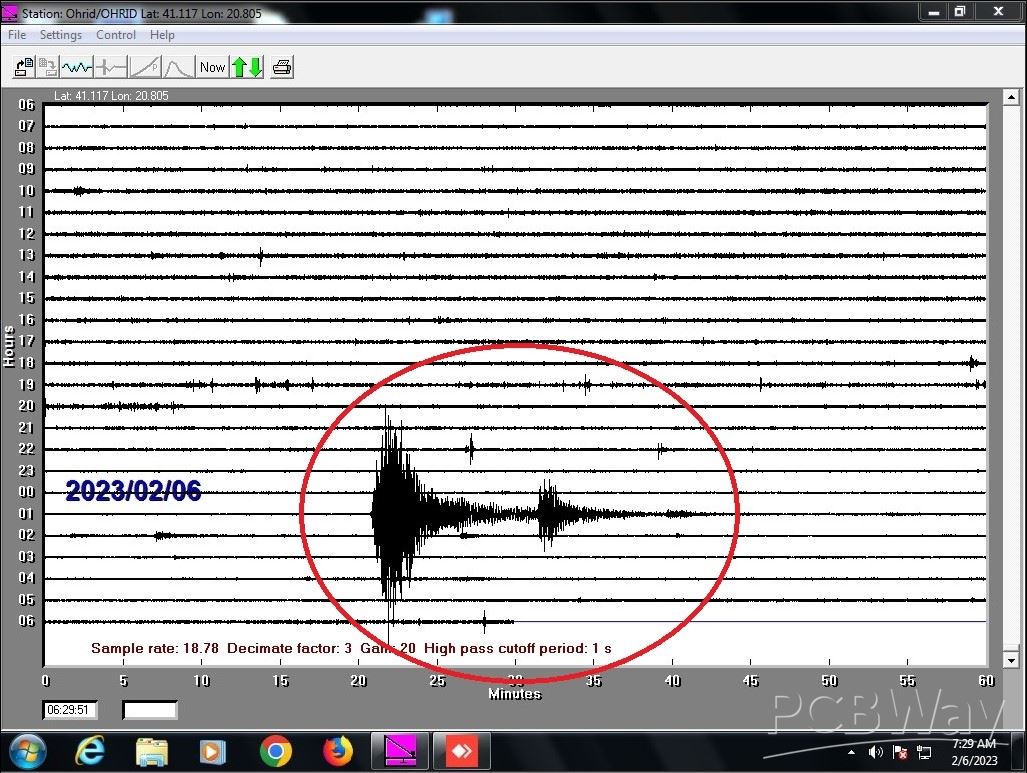
2. A very strong earthquake occurred at 01:17 UTC (6 February 2023), with a magnitude of 7.8 degrees on the Richter scale 37 km WNW of Gaziantep, Turkey
3.Local Earthquake with a magnitude of 3.8 on the Richter scale northeast of Korca, Albania 25 April 2023


DIY Extremly Sensitive and cheap Geophone sensor for Earthquakes detecting


- Comments(0)
- Likes(0)
More by Mirko Pavleski
-
 Simple ESP32 Internet radio on VFD Display
Internet radio, also known as online radio or streaming radio, refers to the broadcasting of audio ...
Simple ESP32 Internet radio on VFD Display
Internet radio, also known as online radio or streaming radio, refers to the broadcasting of audio ...
-
 Short review of small music Tesla Coil with Bluetooth
A Solid State Tesla Coil (SSTC) is a type of Tesla coil that uses solid-state electronic components...
Short review of small music Tesla Coil with Bluetooth
A Solid State Tesla Coil (SSTC) is a type of Tesla coil that uses solid-state electronic components...
-
 Testing 2500W Large Induction Heater
An induction heater is a device that uses electromagnetic induction to heat objects. It consists of...
Testing 2500W Large Induction Heater
An induction heater is a device that uses electromagnetic induction to heat objects. It consists of...
-
 Arduino FFT Audio Spectrum analyzer on 8x32 color matrix WS2812B
The spectrum analyzer displays the amplitude of signals as a function of frequency, allowing engine...
Arduino FFT Audio Spectrum analyzer on 8x32 color matrix WS2812B
The spectrum analyzer displays the amplitude of signals as a function of frequency, allowing engine...
-
 Unusual Led Ring Arduino Clock, Temperature, and Humidity meter
There are many arduino clock projects with temperature and humidity readings where the results are ...
Unusual Led Ring Arduino Clock, Temperature, and Humidity meter
There are many arduino clock projects with temperature and humidity readings where the results are ...
-
 How to make simple portable PEMF Magnetic Pulser
PEMF (Pulsed Electromagnetic Field Therapy), which is also known as magnetic pulse therapy uses ele...
How to make simple portable PEMF Magnetic Pulser
PEMF (Pulsed Electromagnetic Field Therapy), which is also known as magnetic pulse therapy uses ele...
-
 Single Mosfet Mini SSTC Tesla coil with 10 + cm Spark
A Solid State Tesla Coil (SSTC) is a type of Tesla coil that uses solid-state components such as tr...
Single Mosfet Mini SSTC Tesla coil with 10 + cm Spark
A Solid State Tesla Coil (SSTC) is a type of Tesla coil that uses solid-state components such as tr...
-
 How to Make EM84 (6E2) Vacuum Tube Stereo VU Meter
A VU meter, also known as a Volume Unit meter, is a device used to display the audio signal level ...
How to Make EM84 (6E2) Vacuum Tube Stereo VU Meter
A VU meter, also known as a Volume Unit meter, is a device used to display the audio signal level ...
-
 Universal Arduino Staccato controller for SSTC and VTCC Tesla Coils
The VTTC Staccato Controller was developed in the attempt to create longer sparks from VTTCs while ...
Universal Arduino Staccato controller for SSTC and VTCC Tesla Coils
The VTTC Staccato Controller was developed in the attempt to create longer sparks from VTTCs while ...
-
 DIY extremly Sensitive and cheap Arduino Seismometer
A seismometer, is an instrument used to detect and record ground motion caused by seismic waves, su...
DIY extremly Sensitive and cheap Arduino Seismometer
A seismometer, is an instrument used to detect and record ground motion caused by seismic waves, su...
-
 DIY Extremly Sensitive and cheap Geophone sensor for Earthquakes detecting
A geophone is a device used in geophysics to detect ground movement. It is specifically designed to...
DIY Extremly Sensitive and cheap Geophone sensor for Earthquakes detecting
A geophone is a device used in geophysics to detect ground movement. It is specifically designed to...
-
 Arduino FFT Spectrum analyzer on VFD display GP1287
An audio spectrum analyzer is a device that visualizes the frequency content of an audio signal. It...
Arduino FFT Spectrum analyzer on VFD display GP1287
An audio spectrum analyzer is a device that visualizes the frequency content of an audio signal. It...
-
 DIY simple Spark Gap Tesla Coil
Tesla coil is a type of resonant transformer circuit invented by Nikola Tesla around 1891. It is a ...
DIY simple Spark Gap Tesla Coil
Tesla coil is a type of resonant transformer circuit invented by Nikola Tesla around 1891. It is a ...
-
 DIY PC controlled high power PEMF Therapy Device
PEMF or Pulsed Electromagnetic Field therapy is a type of therapy that uses electromagnetic fields ...
DIY PC controlled high power PEMF Therapy Device
PEMF or Pulsed Electromagnetic Field therapy is a type of therapy that uses electromagnetic fields ...
-
 DIY Precise Arduino Miliohmmeter
In practice, we very often need to measure low resistances. Measuring low-value resistances, especi...
DIY Precise Arduino Miliohmmeter
In practice, we very often need to measure low resistances. Measuring low-value resistances, especi...
-
 The simplest way to determine the quality of lighting in your home - bulb flickering meter
Light flickering can be a common issue and may occur with various types of bulbs, including incande...
The simplest way to determine the quality of lighting in your home - bulb flickering meter
Light flickering can be a common issue and may occur with various types of bulbs, including incande...
-
 Classic Style Arduino Weather Station with three Oled Displays
So far I have made several weather stations that display local values as well as internet data, whic...
Classic Style Arduino Weather Station with three Oled Displays
So far I have made several weather stations that display local values as well as internet data, whic...
-
 How to build simple cheap Hulda Clark Syncrometer
Hulda Clark's Syncrometer was a device she claimed could detect the presence of various substances ...
How to build simple cheap Hulda Clark Syncrometer
Hulda Clark's Syncrometer was a device she claimed could detect the presence of various substances ...
-
BEAPER Nano (Beginner Electronics and Programming Educational Robot) for Arduino Nano ESP32
161 0 0 -
-
Open Source Very Large Stick - Freejoy & MMjoy2 breakout board
629 0 0 -
RF Control training board for students based on ESP32 C3
816 0 2 -
-
KINETIC COASTERS with a TWIST! Laser or 3D Print some DIY Magic
685 0 1 -
RPI - 8 IO PLC With ATTiny85 Watch Dog
588 0 1


