


UltraSonic Level Sensor
Ultrasonic Level sensor also know as Fill sensor is a tool that is used to precisely measure short distances. It uses a HCSR04 ultrasonic sensor module to measure the distance between the sensor and an object in front of it. Ultrasonic ranging module HC - SR04 provides 2cm - 400cm non-contact measurement function, the ranging accuracy can reach to 3mm. The modules includes ultrasonic transmitters, receiver and control circuit.

The basic principle of work :
(1) Using IO trigger for at least 10us high level signal,
(2) The Module automatically sends eight 40 kHz and detect whether there is a
pulse signal back.
(3) If the signal back, through high level , time of high output IO duration is
the time from sending ultrasonic to returning.
Test distance = (high level time×velocity of sound (340M/S) / 2.


Wiring connections as follows :
There are 4 pins available on the sensor. Which are VCC, Trig, Echo, GND. This sensor can be connected to any digital microcontroller such as Arduino, ESP8266, Raspberry PI etc. The sensor runs on 5v so we need to power it up using 5v power supply. Here I have used ESP8266 12E module to run this sensor.


connection to the sensor as follows,
VCC --> VCC
TRIG --> GPIO5
ECHO --> GPIO4
GND --> GND
Now, to power the whole circuit I have used 18650 Li-ion cell. This battery has a maximum output power of 4.2 volt, which is OK for this project. And has a maximum capacity of 2600mAH which is enough to power the whole system for a really long period of time. As this cells are rechargeable so we can recharge this battery once the output voltage gets under threshold limit. The battery is connected to the PCB using a battery holder placed underneath the PCB.
To visualize the data I will be using BLYNK IOT platform, which is a very convenient app for such projects. The ultrasonic sensor measures the distance and via WiFi it displays it in the LCD of the Blynk app. Before running this code make sure you have the Blynk app in your smartphone. You can download it here: https://play.google.com/store/apps/details?id=cc.blynk&hl=en
Also make sure your Arduino IDE has the Blynk library. To get the library visit this link: https://github.com/blynkkk/blynk-library/releases/tag/v0.4.8

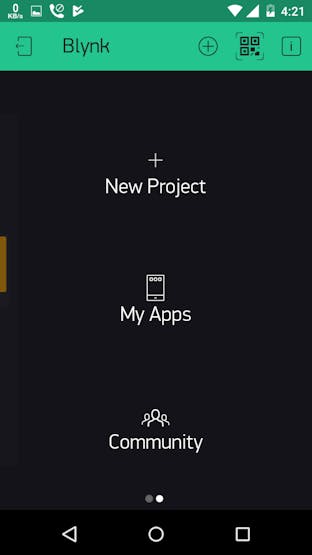
In the Blynk app first create New Project, then give a project name, your device (NodeMCU in my case) and connection type (WiFi for me). Soon you will receive an auth token in your registered email.

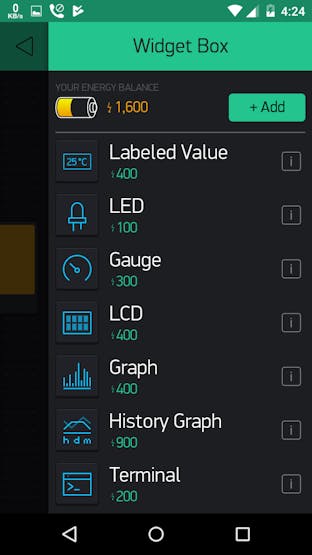
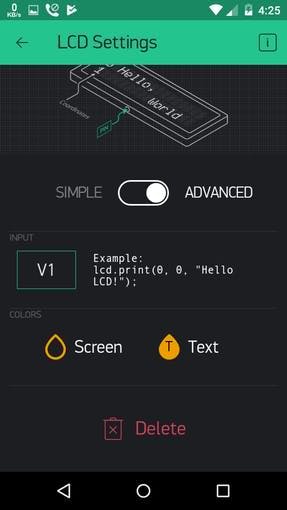
Then click on the add widget button, followed by LCD. You can then see the LCD on your dashboard . Click on it and set it to advanced and input V1 (virtual input):
Then open the Arduino IDE and paste the code. Final results:

Code :
#include <ESP8266WiFi.h>
#include <BlynkSimpleEsp8266.h>
#define TRIGGERPIN 5
#define ECHOPIN    4
// You should get Auth Token in the Blynk App.
// Go to the Project Settings (nut icon).
char auth[] = "Your auth token";

// Your WiFi credentials.
// Set password to "" for open networks.
char ssid[] = "your wifi SSID";
char pass[] = "your password";

WidgetLCD lcd(V1);

void setup()
{
  // Debug console
  Serial.begin(9600);
pinMode(TRIGGERPIN, OUTPUT);
  pinMode(ECHOPIN, INPUT);
  Blynk.begin(auth, ssid, pass);
  // You can also specify server:
  //Blynk.begin(auth, ssid, pass, "blynk-cloud.com", 8442);
  //Blynk.begin(auth, ssid, pass, IPAddress(192,168,1,100), 8442);

  lcd.clear(); //Use it to clear the LCD Widget
  lcd.print(0, 0, "Distance in cm"); // use: (position X: 0-15, position Y: 0-1, "Message you want to print")
  // Please use timed events when LCD printintg in void loop to avoid sending too many commands
  // It will cause a FLOOD Error, and connection will be dropped
}

void loop()
{
  lcd.clear();
  lcd.print(0, 0, "Distance in cm"); // use: (position X: 0-15, position Y: 0-1, "Message you want to print")
  long duration, distance;
  digitalWrite(TRIGGERPIN, LOW);
  delayMicroseconds(3);

  digitalWrite(TRIGGERPIN, HIGH);
  delayMicroseconds(12);

  digitalWrite(TRIGGERPIN, LOW);
  duration = pulseIn(ECHOPIN, HIGH);
  distance = (duration/2) / 29.1;
  Serial.print(distance);
  Serial.println("Cm");
  lcd.print(7, 1, distance);
  Blynk.run();

  delay(3500);

}
- Comments(0)
- Likes(0)


